Why I Use Luminance Masks Instead of Color Grading for Black & White Toning in Lightroom
When photographers want to add a tint to a black and white photo—think selenium, sepia, or cyanotype—the default move in Lightroom is almost always the Color Grading panel.
It works. It’s fast. And for a lot of images, it’s good enough.
But it’s not how I do it. At least when I’m tinting with a single color.
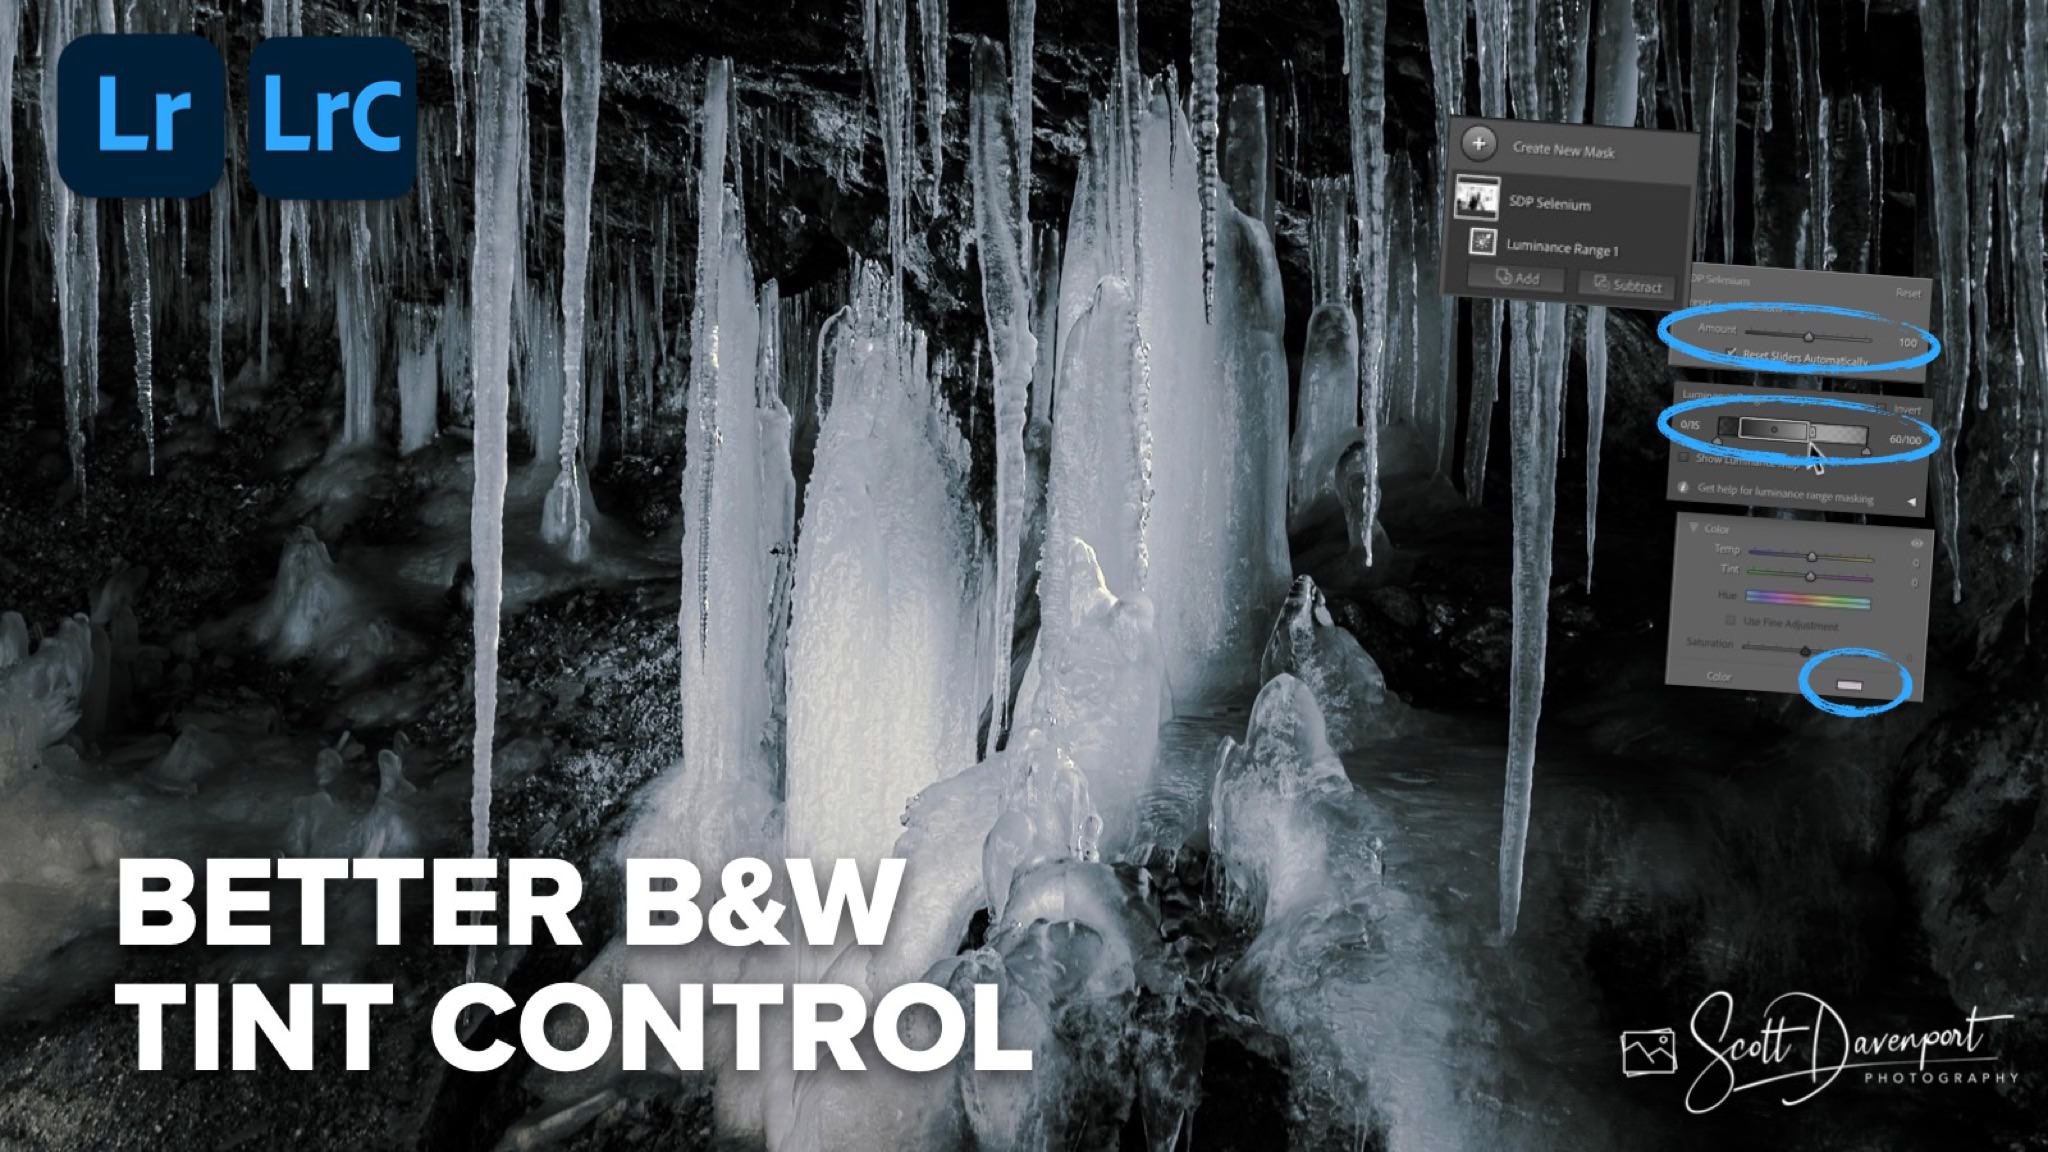
When I’m toning a black and white image in Lightroom, I want control. Not just over the color itself, but over which tones are affected, how strong the effect is, and how easily I can reuse the look in the future. That’s why I rely on luminance range masks with a color tint instead of Color Grading.
The Problem with Color Grading for Single-Color Tints
Color Grading is powerful, but it’s designed to work across broad tonal ranges—shadows, midtones, and highlights. That’s great when you’re trying to build complex color relationships.
For classic black and white toning with a single tint, though, that can actually get in the way.
If you’re applying a single tint:
You’re limited to Lightroom’s predefined tonal buckets
Fine adjustments can feel vague or indirect
The effect often spreads more evenly than you might want
In other words, you’re telling Lightroom roughly where to apply the tint, not precisely. And the Global pane in Color Grading is, well, global!
Why Luminance Range Masks Give You More Control
A luminance range mask lets you target tones based on brightness values—not abstract tonal zones. That means you can decide:
Exactly how deep into the shadows the tint reaches
Where it starts to fade in the midtones
Whether highlights are affected at all
Instead of guessing, you’re shaping the toning effect with intention. Subtle selenium in the shadows? Easy. Cyanotype that lives everywhere except the purest blacks and crispest whites? No problem.
This approach feels less like “applying a look” and more like sculpting tone.
Fine-Tuning with the Mask Amount Slider
One of the most overlooked advantages of this workflow is the Amount slider for the mask. Once the tint is applied, you’re not locked into a fixed intensity. You can:
Dial the effect back without re-editing
Increase the strength without pushing color sliders too far
Make quick creative decisions without breaking the tonal balance
It’s a simple control, but it gives you a level of finesse that Color Grading just doesn’t offer for single-color toning.
Saving Masks as Presets (This Is a Big One)
Here’s where this workflow really shines. Because the tint lives inside its own mask, you can save that mask as a standalone preset. That means:
One-click selenium toning
Reusable cyanotype looks
Consistent results across multiple images
And because it’s mask-based, the preset adapts to each photo’s tonal structure instead of blindly applying color values. That’s a huge advantage if you care about consistency and nuance.
When I Still Use Color Grading
This isn’t an anti–Color Grading rant. If I’m building a multi-tone look, mixing warm highlights with cool shadows, or doing something more stylized, Color Grading is still the right tool. But for classic black and white toning, it’s often more than I need—and less precise than I want.
It’s About Control
At the end of the day, this comes down to philosophy. Color Grading is convenient yet broad. Luminance masks are deliberate and precise.
If you care about how tone, light, and mood work together in your black and white photos, the masking approach gives you the control to make those decisions consciously—and repeat them reliably. That’s why I use luminance range masks for black and white toning in Lightroom.
Ice, Mossy Cave, Utah
Contact Scott to commission a print or license this image.