The Replace Color Filter - ON1 Photo RAW 2021
If you are trying ON1 Photo RAW 2021, the ON1 plug-ins, or upgrading from an older version, please consider using my affiliate link. There is no extra cost to you and it helps support ON1 tutorials like this one. Ready to buy? Use the offer code SDP20 at checkout and SAVE 20%!
Quickly and easily replace one color with another using the Replace Color filter in ON1 Effects. In this article, all of the Replace Color filter controls are described. I’ll also share a suggested workflow and some tips to refine the color replacement using the masking and blending tools available in ON1.
The Replace Color Filter Controls
Like all filters in ON1 Effects, the Replace Color filter has an overall Opacity slider and a few built-in styles (they’re like filter-specific presets). The styles are sometimes a good starting point. The true power of the filter is the immense control it gives photographers. The sliders are grouped into two sections, Target Color and Color Change.
The Target Color sliders set the color you want to replace in your photo. It’s the color you want to get rid of. There are three controls in this area:
Color swatch/eyedropper: Use the swatch or eyedropper to set the color you want to replace in your image. The simplest form of using this is to select the eyedropper and click on a color in your photo. The color swatch is set to the color you click on.
Range: Control how much “breadth” the color replacement has. Increasing the Range slider includes colors similar to the selected color in the replacement.
Amount: Set how much of the target color is replaced.
The default Amount is 100, and is typically fine. All of the colors within the range of the target color are exchanged with a new color, set in the next section of controls. Lowering the Amount slider does a partial replacement, a mixing of colors. I typically leave the Amount at 100 and control the target color with the Color Change sliders.
The Color Change sliders set the new color to replace the target color. There are three sliders to dial in the precise tone you want.
Hue: Set the new color, the color to use to replace the target color.
Saturation: Control how rich or muted the replacement color is.
Brightness: Set how bright or dark the replacement color is.
Alternatively, click the color swatch in the Color Change area and set a new color using onscreen controls. These controls vary depending if you are running macOS or Windows. I like the color wheel on macOS. As I click and drag around the color wheel, the color replacement happens in real time. The sliders in the Color Change area are also updated to reflect the current selection.
Replace Color: Choose a Target Color from your photo to replace and set a new replacement color in the Color Change area.
Set the replacement color using the sliders or the color swatch in the Color Change section of the Replace Color filter.
Replace Color Workflow
A typical workflow for the Replace Color filter is:
Add the Replace Color filter to the filter stack.
Choose the eyedropper in the Target Color area of the filter.
Click on a color in your photo to replace.
Adjust the Range slider to increase or decrease how broad or narrow the color replacement is
Click the color swatch in the Change Color area
Use the color wheel or other on-screen controls to set a new, replacement color.
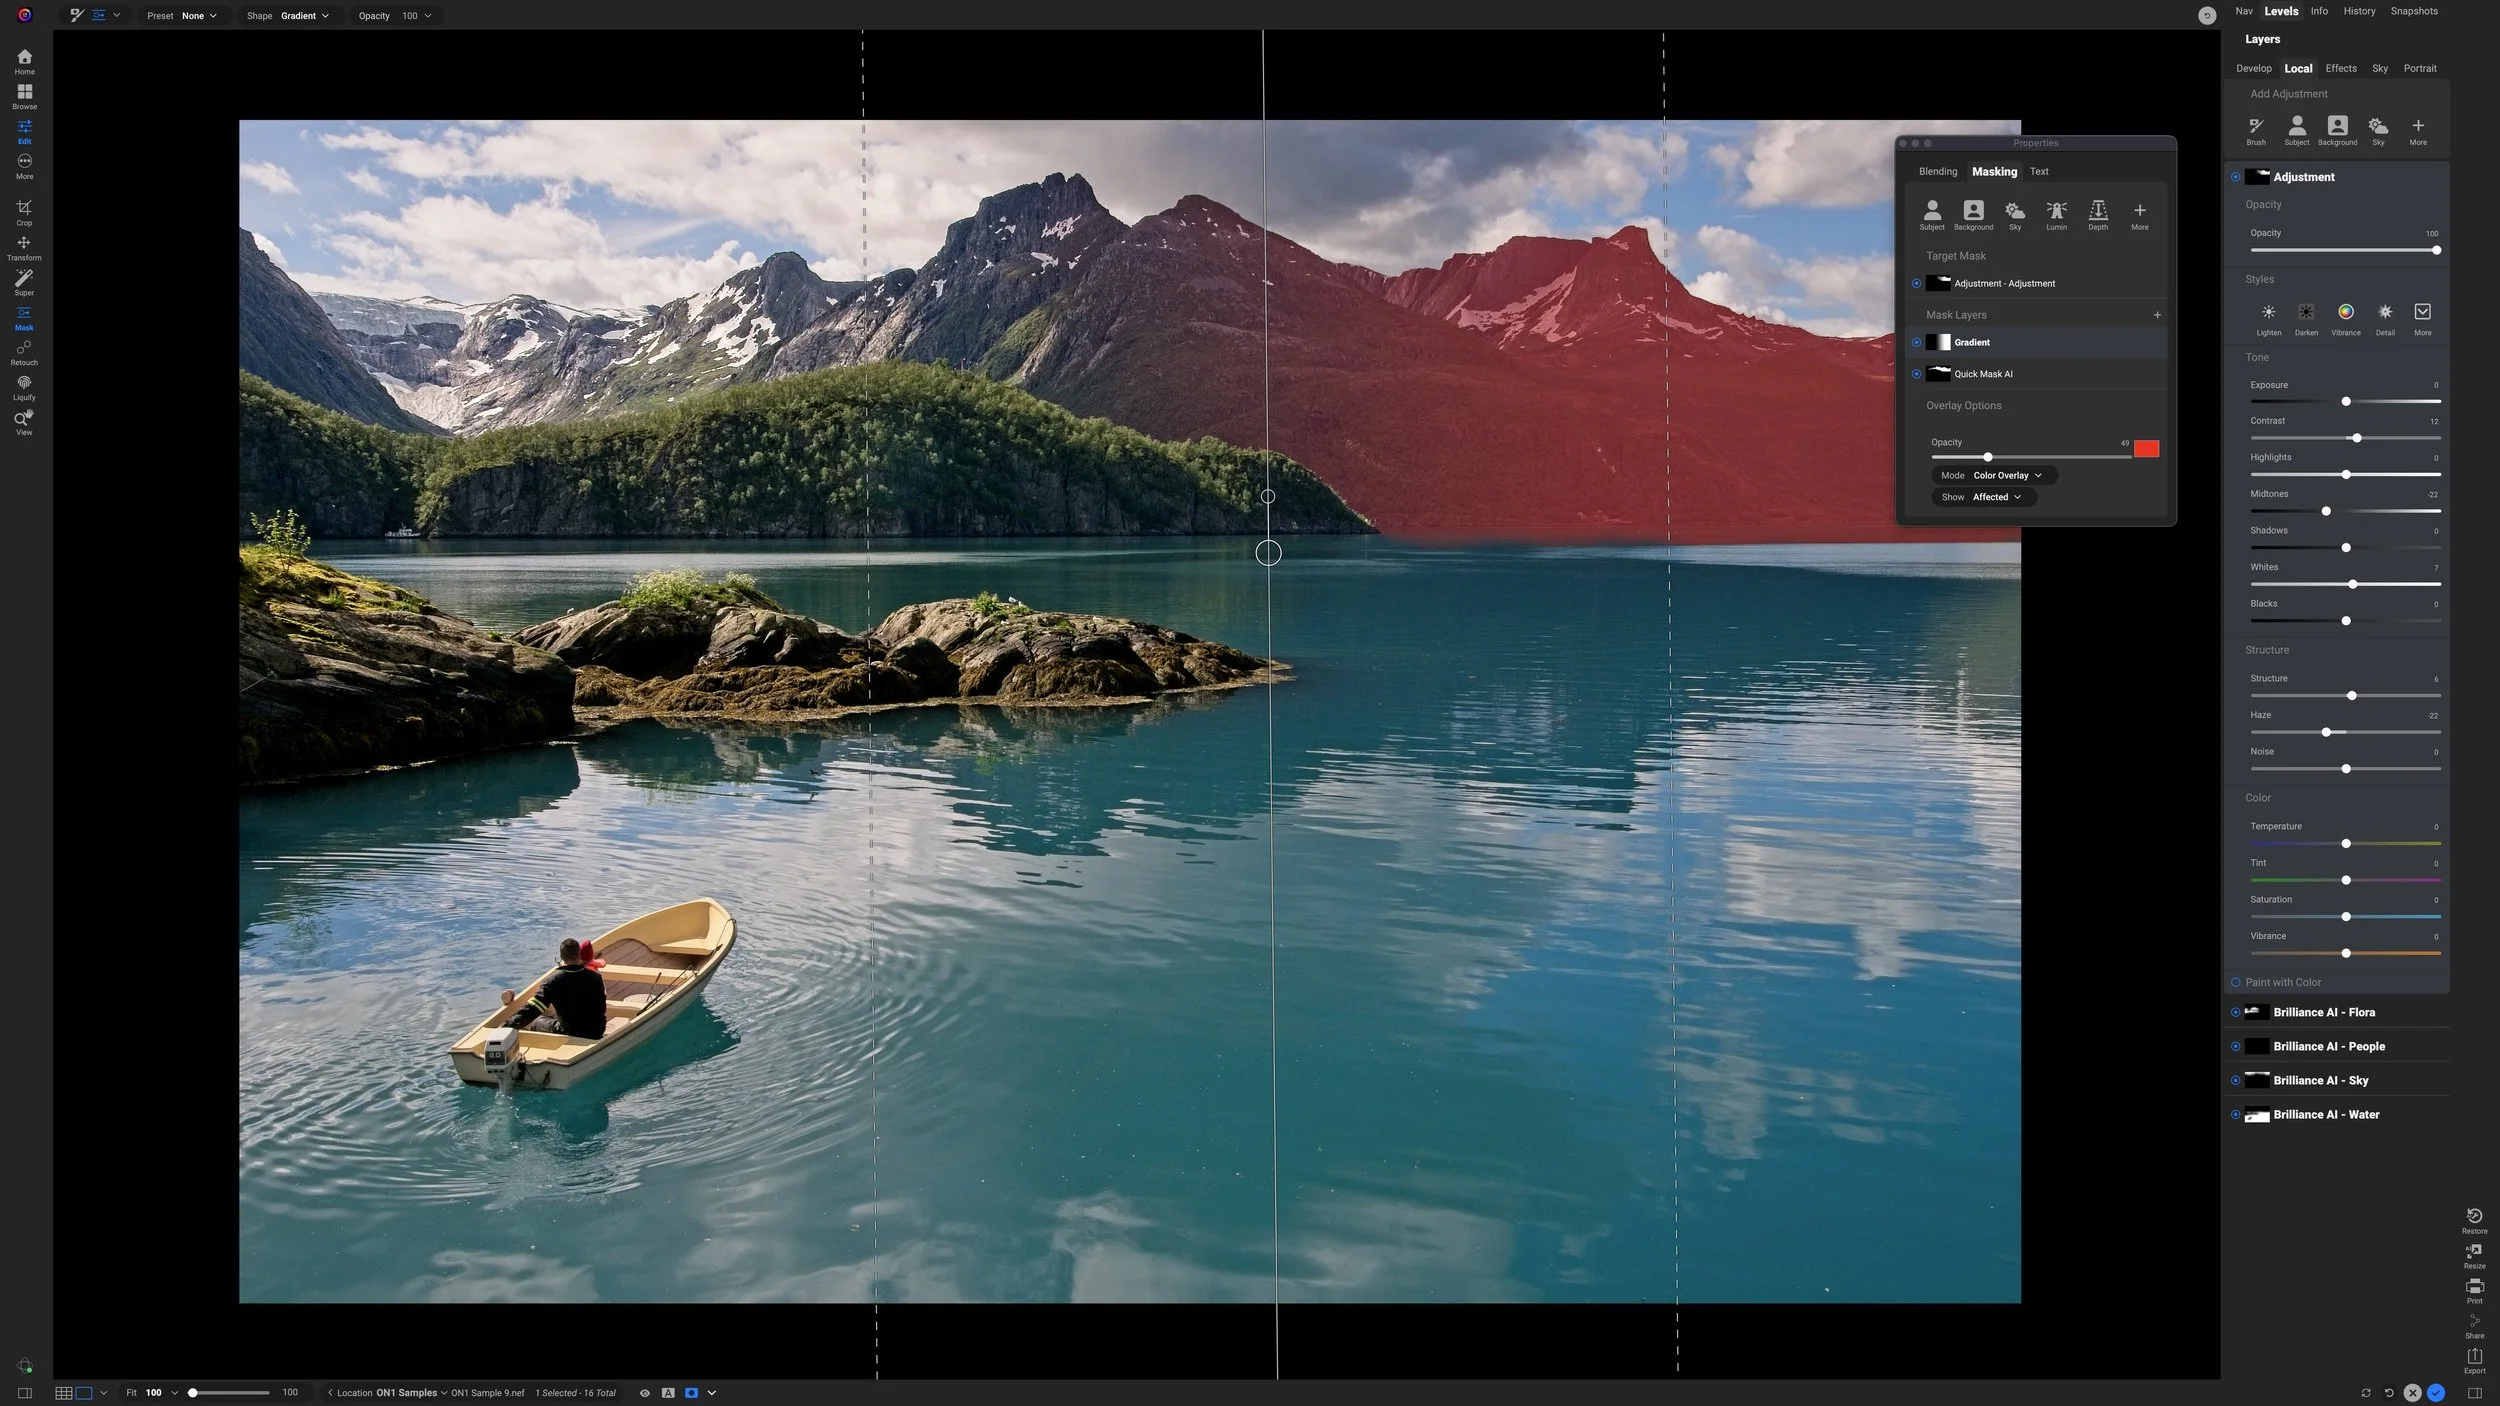
Adjusting the Range slider is often a balancing act between insufficient color replacement for your subject and affecting other areas of your photo you don’t want altered. Pushing the Range slider too high may introduce artifacts in areas of your photo you don’t want to stylize. My guidance is to set the Range slider so your primary subject looks good. Get the color replacement right for your subject. Then, use the masking and blending tools in the filter to refine the color replacement.


Fine-Tune Replace Color With Masking Tools And Blending Options
Replace Color does a lot of the heavy lifting for color replacement. Yet it does usually need a little fine tuning. After dialing in the sliders, skim around your photo and make notes about any problem areas. If there is color replacement happening in areas you don’t want affected, use the masking tools to reduce or remove the color replacement from those areas. If certain tonal regions need to be protected, try applying the protection sliders in the Blending Options (gear menu) of the filter to downplay color replacement in the highlights, midtones, or shadows.
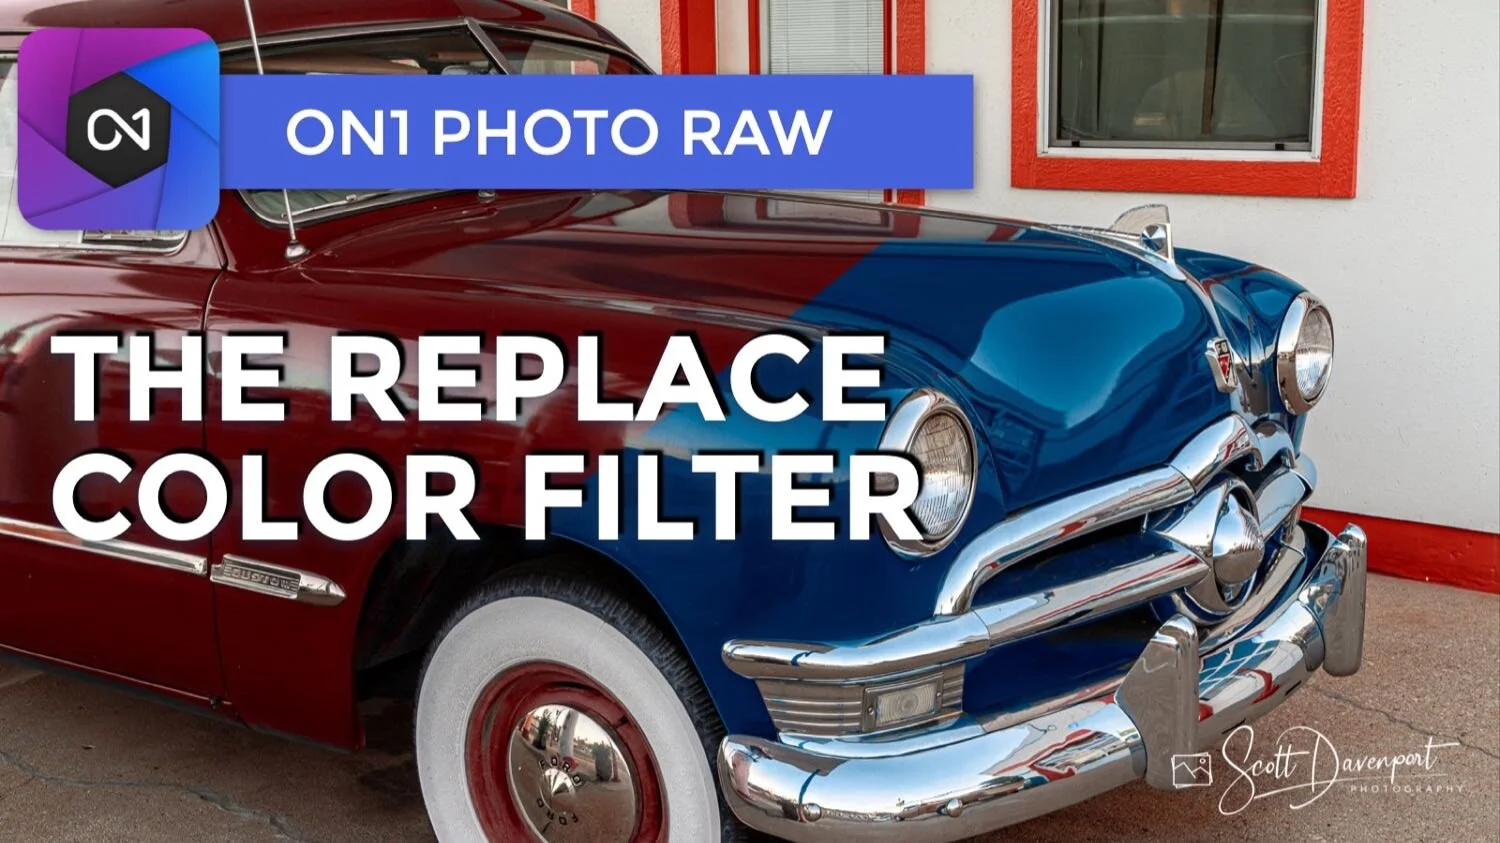
In the photo of the car in this article, replacing the car’s original blue with a red tone created red tones in the whitewalls of the tire and the chrome fenders. I used the masking tools to remove the Replace Color effect from the whitewall and tire - the red tint didn’t look pleasing there. For the fenders, increasing the Highlights slider in the Blending Options area reduced the amount of red in the fenders. Some red needs to be there - the paint will reflect in the fenders. Yet downplaying it felt better for the image.
Use the masking tools to remove color replacement from unwanted areas.
Protect certain tonal ranges from the Replace Color effect using the sliders in the Blending Options.
Touch Ups With Local Adjustments
Some color replacements may need extra care, beyond what a single Replace Color filter can achieve. For example, a color range that spans a very wide range of tones may exceed the reach of the Range slider. In these cases, you have the option of adding a second Replace Color filter. If you are using ON1 Effects as a plug-in, this is a good approach.
However, if you are using ON1 Photo RAW, you can use a Local Adjustment to touch up gaps in the color replacement. The Local Adjustment has a Paint With Color option that can be set to a Replace Color mode. Select the same color as the Target Color in the Replace Color filter and brush in color touchups. I recommend a hard-edged brush (zero feather) and a low opacity for a clean blend.
Watch the video at about the 10 minute mark to see how Local Adjustments
Car In Willims Arizona Blue Redux
Contact Scott to commission a print or license this image.