Tips For The Atmosphere AI Tool In Luminar AI
If you are trying Luminar AI or upgrading from a prior version, please consider using my affiliate link. There is no extra cost to you and it helps support Luminar AI tutorials like this one. Ready to buy? Use the offer code SDP10 at checkout and Save US$10!
Atmosphere AI adds a fog or mist effect to a scene. It’s great for accenting and enhancing photos that already have some amount of atmosphere in them. However, it’s not for use with every photo. In this article and video, I explain the four types of atmosphere you can add with the Atmosphere AI tool, a couple of tips to use the tool effectively, and an example of when Atmosphere AI just isn’t working as you might want it to.
The Four Modes Of Atmosphere AI
There are four types of atmosphere you can add to an image with Atmosphere AI: Fog, Layered Fog, Mist, and Haze. Use the Mode popup menu to choose an atmosphere type. The primary difference among the atmosphere types is what areas of your photo are affected. Luminar AI detects all sorts of objects and elements in a photo, such as the sky, the horizon line, structures, and so on. I’ve noticed Atmosphere AI behavior is swayed mostly by what the AI determines is ground level.
All of the atmosphere modes have three controls:
Amount: Set how much atmosphere is added to the photo
Depth: Control the “reach” of the atmosphere into the photo, how much of a scene is affected by the look
Lightness: Set how gray or white the atmosphere effect is. Higher numbers are closer to bright white.
Let’s look a little deeper at the modes of Atmosphere AI.
Fog and Mist
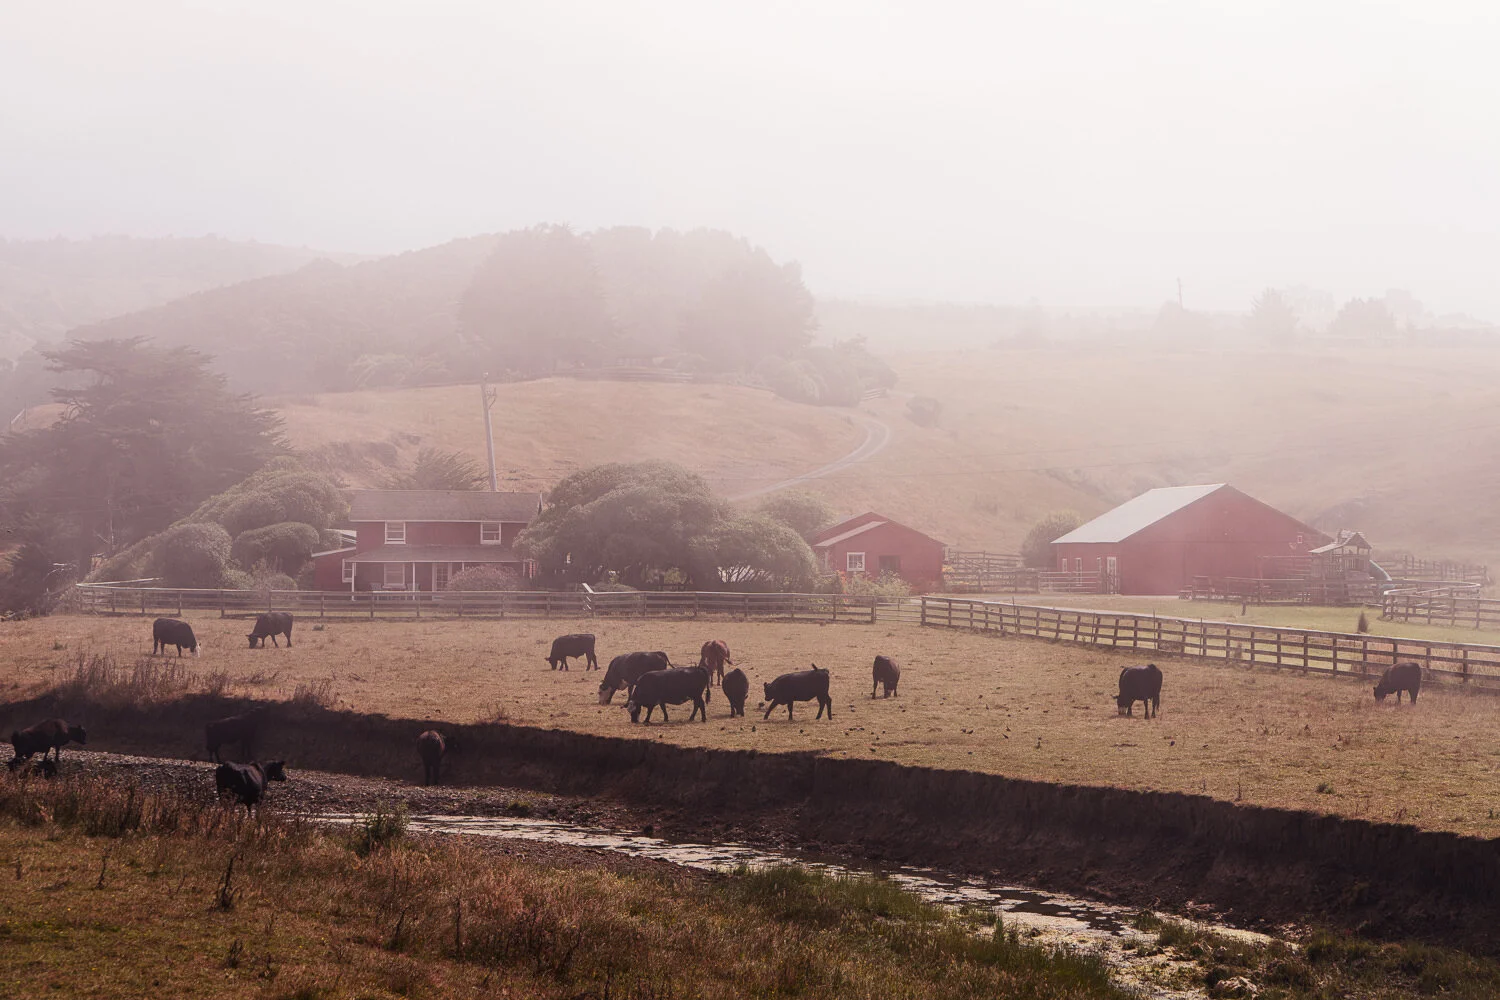
I group Fog and Mist together because these two types of atmosphere both target segments of a photo well above ground. In the scene below of a farmhouse in the Oregon countryside, both Fog and Mist affect the upper part of the photo. The atmosphere can be pushed farther into the mid ground and a touch into the foreground with the Depth slider.
So what’s the difference between the two? A lot depends on the photo in question. Try both of them out. You’ll notice differences in how each mixed and blends with your image. As a general rule of thumb, Mist tends to be a little more aggressive than Fog, although it can easily be toned down with the Depth slider.
Atmosphere AI - Fog : This mode targets areas of the photo well-above ground level.
Atmosphere AI - Mist : This mode also targets areas of the photo well-above ground level. The mix with the photo is a little different than Fog.
Layered Fog And Haze
The Layered Fog and Haze modes are another partner pair of atmosphere modes. These modes add atmosphere to ground level. Ground level is auto-determined by Luminar AI’s internal analysis of your image. Changing the Depth slider will expand the atmospheric effect outward from its auto-detected axis. However, there is unfortunately no control raise or lower the reference point for the atmosphere.
Layered Fog hovers right at ground level where Haze is a little higher and permeates toward the sky a little more. In this countryside scene, notice the difference in the secondary tree line where the farmhouse is. Haze affects this area much more than Layered Fog. In a countryside scene like this, Layered Fog is like a morning mist after an evening frost. As the sun rises and the earth warms, frost on the grasses evaporates creating a low layer of fog. Haze is akin to a dusty atmosphere or smog in urban settings.
As with the other two modes, you can quickly audition each mode and see which blends better with your photo. Quite a bit depends on the elements in your photo and how the AI analyzes it.
Atmosphere AI - Layered Fog : This mode adds atmosphere at or very near ground level.
Atmosphere AI - Haze: This mode adds atmosphere at low “altitudes” in your photo, not quite ground level yet well below the sky.
Natural Light Sources
The Atmosphere AI tool is light source aware. The atmosphere added will be amplified more in brighter areas of the photo. Notice in this photo of a forest scene, there is a natural light source in the upper left of the frame. There is also little to no natural atmosphere in the photo. When Atmosphere AI is added and the Depth slider increased, the fog or mist is more prominent in the upper left quadrant of the photo. The large tree on the right side of the frame is largely unaffected.
This forest scene has a natural light source in the upper left of the frame.
Atmosphere AI understands light sources in a photo. Notice how the fog emanates from the upper left and reaches into the scene.
Use The Masking Tools
As good as Luminar AI is in analyzing a photo, finding horizon lines, and identifying objects, it is not perfect. In some cases, you may want a stronger look for Atmosphere AI in an important part of your photo. However, pushing the Amount and Depth sliders to the right may cause the fog, mist, or haze to bleed into areas you do not want affected.
In this photo of a desert valley, I wanted to boost the natural haze even more with Atmosphere AI. The additional haze looks very nice, however the look I wanted in the valley caused the haze to bleed over the ridge line in the foreground. Like most tools in Luminar AI, you can use the masking tools with Atmosphere AI. In my example, I used the Erase option of the Paint Brush mask to remove the tool effect from the edge of the ridge line. I did not need to erase the entire foreground, because I wasn't pushing the Depth slider so far to have atmosphere creep all the way into the foreground.
Masking tools are available with Atmosphere AI. Increasing the Amount and Depth sliders caused the added Haze to bleed over the foreground ridge line. A mask protected the edge.
After the mask, the haze is amplified in the desert valley while keeping the foreground darker and silhouetted.
A quick and imprecise yet effective mask let me use the Atmosphere AI tool to accent the valley without sacrificing the crisp line of the ridge. I also used a mask in the earlier forest photo to remove a little atmosphere from from the vertical mossy stick on the left side of the frame.
Don’t Force The Atmosphere Effect
The Atmosphere AI effect is cool, but it can’t be jammed into every photo. It may not yield the vision you have in your mind’s eye. Recall the forest photo above? I tried using a Layered Fog effect to simulate a low, smoky layer of fog in the forest. It simply didn’t work and looked false.
In this seascape example, I thought an amount of low-level fog meandering between the rocks would be a pleasing effect. However, when I tried the Layered Fog and Haze modes, the AI determined ground level on the beach, not at the midground horizon line. The foreground rocks got too much atmosphere and required masking. Increasing the Depth slider would only push the fog into the midground part of the way, and also increased the need for masking work. A luminosity mask would have been a quicker fix (hide the effect from the dark areas, the rocks), however that type of mask is not available in Luminar AI.
The added atmosphere is not weaving in and among the midground rocks the way I’d envisioned the effect.
Manual masking helped some. A luminosity mask would have been useful, but not an option in Luminar AI.
In the end, the Atmosphere AI look feels forced. It is not a good fit for every photo.
So don’t force the effect. It may not work or may look false. You are also, to a degree, at the mercy of what part of the photo the AI decides to use as the reference point.
Conclusion
Atmosphere AI offers you another level of creative control over your imagery. I find it is a wonderful accent to photos that have some amount of atmospherics in them already. Take mind of the light sources in your scene - the fog or mist you add will interact with those light sources. Don’t be afraid to experiment with the different types and tinker with the Depth and Amount slider. Also, don’t try to force the look. It’s a tool in the toolbox, but not necessarily the tool for every photo.
Sunrise Highway Haze
Contact Scott to commission a print or license this image.
Oregon Countryside
Contact Scott to commission a print or license this image.
Overgrown Bright
Contact Scott to commission a print or license this image.