My Aperture Workflow
July 27 2012
Most everything below I still use every day when processing photos. It's still a good read (IMHO :) and a good source to help you refine your Aperture workflow. Be sure to check out how my workflow has changed in the last year, most notably library imports and exports using multiple systems. And the workflow Smart Albums I use to help stay on track. Or, just buy my book on Aperture Workflow.
Thx,
-scott
Intro
This isn't a new topic on the web by any stretch of the means. And perhaps as you, when I first started using Aperture, I spent time looking for how others managed their workflow. And plenty of folks have graciously posted their workflows, spoke about them in podcasts, and so forth. I took the ideas and approaches that "spoke to me" and integrated them into my workflow. After several months of tweaking and tuning - and a little more backtracking that I'd care to admin - I've arrived at a stable workflow that works for me. In the spirit of giving back, my Aperture workflow is below.
Let me stress one thing again. This is a workflow that works for me. Aperture is completely flexible when it comes to defining a workflow. In the long term, it is a true strength of the tool - your workflow can be entirely tailored to you, your tastes, how you're wired to think. But in the short term, it's a formidable weakness - figuring out where to begin can be challenging to say the least.
Know Your Goals
I've found that the process of determining your workflow isn't linear, it's more iterative. While I've settled into what I think is a good workflow for me, I'll still make tweaks as I discover more things. To get started, I suggest you ask yourself, "How do I want to use my photos?" In my first post, I said I started using Aperture to get control of my digital life, so basic organization was an obvious goal for me. I invested the time to think about my goals for my pictures. And others surfaced. My goals:
- Get Organized: I want a one-stop for all of my photos, so a single library. I think chronologically, so organization by month and year. I also want separation of the month-to-month family snapshots, from special occasions, from my more "serious" (and I use that term liberally) work.
- Knowing "Where": When looking at older printed photos, I hate asking myself "Where was this taken?" I was never good at writing notes on the backs of prints. Reminiscing about travels and visits is usually fun, but the "where" question annoys me. I swooned over the geo-tagging support in Aperture. And the end experience when looking at photos by location on an iPad is very slick.
- Finding Photos: As my library grows and contains years of photos, I want to be able to find what I'm looking for quickly. Consistency in rating and keywording helps greatly with this.
- Enable Retrospective Books and Albums: In the future, I envision wanting to put together "look back" types of albums, such as the kids growing up, travel highlights from a the decade, etc. As with finding photos, rating and keywording become very important.
- Squash My Paranoia: I backup my masters. I use vaults. I don't want to lose images. And my paranoia extends to the data formats of those images. I shoot in RAW, which isn't a well-defined format. Just about every camera has its own RAW format. Formats change, tools stop supporting older devices, the tech industry generally moves to "the new". Part of my workflow must include storage final versions in something other than RAW Masters + Aperture Adjustments.
- Have a "self-documenting" workflow: I have young kids and typically squeeze my photo hobby into whatever small pockets of space remain in a day. It's rare I'm able to get through my entire workflow on a full project in one sitting. At a glance, I want to look at a photo version and immediately know where in my workflow the image is. And I don't want to have to keep separate notes on where in the process I am for a given project.
While defining your photo goals, I think some experimentation is a wise thing to do. Import a variety of photos, across various shoots, across a wide (subjective term) time span, and simply feel out Aperture. For example, I didn't know how fun viewing photos by location on an iPad would be until I tried it out. That sold me on using Places. It's a bit of extra work (I don't have a GPS enabled camera), but worth the effort in my opinion. I'd guesstimate 100-200 photos would be good - I wish I'd kept my library small at first until I'd solidified my workflow.... would've been much less retroactive work as a result.
My Workflow
So what's your workflow already?!? While technically inaccurate, I don't count "Shoot" as a step. If I didn't go out and shoot pictures, the rest of my workflow is pointless. This is my Aperture workflow...shooting photos is the price of admission. :) I have 7 major steps.
Import | Rate & Reject | Keyword | Stack | Locate | Adjust | Export
I use the color labels in Aperture to track my progress through my workflow. I associate a label with what needs to be done next on a photo:
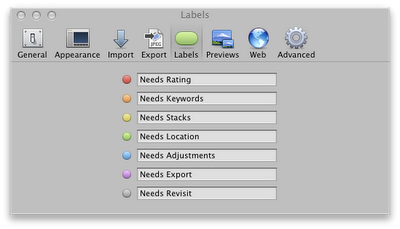
The color labels are very convenient to set via the keyboard as well. From red to gray they are mapped to Cmd-1 through Cmd-7 keyboard shortcuts, and Cmd-0 clearing the label. If you're wondering about that Gray "Needs Revisit" label above....the price I pay for not having nailed down my workflow early, particularly ratings and keywords. Let's get into some more detail.
- Import: Toward my organization goal, I use a simple hierarchy in Aperture. I have three top-level folders: Family Snapshots, Events, and Travel. Within each, I have a folder per year. Projects are stored within a year folder. That's it. I find any other organization by time duplicated effort - I can always filter on the photo date and time. And years from now, I don't expect to ask myself "Where's that great photo I took on June 11th?" I expect it to be more like "Where's that great shot of my daughter by the river in Paris?" And keywords (more on that soon) enable me to do that.
Since I keep my masters as referenced (read why here), as part of the import I move the masters into my master repository. My repository mimics the same hierarchy I have in Aperture - helps keep me sane. The import does other typical things like set basic IPTC data. Lastly, as part of the import, the red color label is assigned, telling me the next thing I need to do is rate.
- Rate & Reject: This is a subjective topic for sure. I use the 5 stars Aperture provides (why wouldn't I? :). What ratings mean to me:
1-star: Flagged for rejection.
2-star: A shot I want to keep, but isn't all that great. Perhaps something I want to experiment with in terms of post-processing. Or an uninspiring photo for which I don't have another good shot. Example: A child receives an award, the lighting is lousy, and I'm shooting through a crowd. It has sentimental value, but is otherwise uninspiring.
3-star: A good shot. Something I certainly want to perform Adjustments on.
4-star: Something I want to share. These are shots I post to the web and sync to my iPad to share with others.
5-star: A fantastic photo, something I want to print. Few photos get 5 stars.
My only advice is be critical. For me, rejecting is just as important as rating. There's times when I take a lot of photos (such as during my son's baseball games). So I generate a lot of crap that needs to get weeded out. If the subject is out of focus or the person is blinking, I reject it. If there's multiple shots of what's more or less the same photo, keep a few worthy shots and reject the rest.
Once I've rated a photo, I mark it with the orange color label. The image needs keywords.
- Keyword: Keywording is by far the lengthiest step in my workflow. But crucial to my goal of wanting to quickly find photos years down the road. I really encourage you to think about your keywording strategy up front - consistency in keywording is also important. I didn't do this and am suffering the consequences (I still have about 3000 images to revisit). I found an excellent post on keywording by William Beem, and I use a modified version of his outline. I have 5 top level keyword buckets: Description, Events, People, Place, and Subject. As William points out in his post, there's potential for overlap, but I think that's better than missing something. The bulk of my keywords are fixed now. Places grow from time to time as I visit somewhere I've not been before. But I really think hard before adding something more fundamentally new (like a human expression or emotion) for fear of wanting to revisit ump-teen photos to ensure keywords are consistent.
Since I use lots of keywords, I generally make two keyword passes at each photo. I'll address subject, place and people first - the what, where, and who. The second pass covers the description - expressions, emotions, image type (conceptual, landscape, skyline, indoor/outdoor, etc.) and so forth. I will keyword night shots - anything not night is, well, daytime. To reduce overlap, I keep my subject keywords generic (man, woman, couple, etc.). Specific people, like family members, are kept in People. If there's interest from folks, maybe I'll post my keyword structure.
I'm quite enamored with nested keywords. For example, I have a "Places" keyword structure of the form: Continent -> Country -> City (I also intercede State for the USA). I tag the photos with at least the City detail, and maybe in some cases go even deeper. But in the future, if I want to see all photos from China, the nested cities will all be included in the search results. Similarly useful for a Family keyword, with specific family members nested beneath.
I err on the side of extensive keywords, and in the short time I've been using Aperture it's already paid off. Last month, my daughter wanted to submit a photo to a model contest, and the contest only accepted full body photos. Thankfully, I'd used keywords including "full body", "half body" and "portrait". With a few clicks, I had a smart album showing me exactly what I needed thanks to keywords.
Once keywording is done, the photo is marked yellow. Next is to check if the image needs stacks.
- Stack: I find stacks useful for keeping my viewer tidy. Once the stacks are made and the picks are done, closing the stacks helps me focus on the photos I really want to work with. The Loupe is helpful when trying to select a pick, particular for shots where peoples faces are smaller. More recently, I've started experimenting with HDR, and found stacks useful to group the various exposures, making the pick the post-processed HDR image.
Once a group of photos has been stacked and I've made my pick, I'll mark all photos in the stack green. And certainly not every photo needs to be stacked. If a photo doesn't need to be in a stack, it's immediately marked green.
- Locate: Next I assign locations. For places that will get used again and again (like home), take a few moments and put them in Manage My Places in the Metadata menu, and adjust the radius according to your tastes. Later, if you're dragging pictures in via Places itself, photos that land within the radius pick up the My Places tag.
So why do I assign places when keywording and also geo-locate the photos? My tastes, I suppose. When searching for photos, I think keywords are faster. But then I also enjoy browsing photos on a map on an iPad. And it typically doesn't take all that long. Once a photo is geo-tagged, it is marked blue.
- Adjust: I start adjustments with stack picks, 4-star, and 5-star photos. Quite often, I can lift and stamp the adjustments to lower rated photos and non-picks in a stack. For 1-star and 2-star photos, I may only adjust the very basics, like the white balance and exposure. If the adjustments turn out wonderful on a photo, I may upgrade the rating.
The adjustments in my default set are RAW Fine Tuning, Crop, White Balance, Exposure, Enhance, Highlights & Shadows, Levels, Edge Sharpen, and Sharpen. I generally try to work these top to bottom as the adjustment build upon one another. For example, do a crop of a photo removing a significant amount of dark or light areas and you'll see the luminance histogram change.
If I make significant adjustments to a stack pick, such as making a black & white version, I will extract that version from the stack. I do this to aid in Smart Albums. Once adjustments are complete, the photo is marked purple.
- Export: This is my paranoia step. As I said in the intro, preservation of my photos is very important to me. I've seen enough data formats come and go. And while there's no guarantee that JPEG will be around for the rest of my lifetime, it's as safe of a choice there is. Thus, my final step is to export a version as a JPEG. I do the export at full quality. Yes, this costs me in terms of disk space, but a cost I'm willing to incur.
Once the export is complete, the color label is cleared.
While I apply the color labels per version, this doesn't mean I perform the entire workflow one photo at a time. It all depends on how much time I have, the nature of the photos, and what I'm immediately trying to accomplish. In some cases, there may be a photo I really want to get posted to the web or email to someone. So I'll work just that one photo. Other times, if the subject of the photos is the same or all were taken in the same location, I'll work with groups of photos (lift and stamp is your friend). By using the labels to track my workflow, I have the flexibility of having different photos in my library at different stages in my workflow.
Cross Checks
Workflow isn't complicated, but it can be error prone. Perhaps it's best described as simple, not easy. As a cross check, I have a Smart Album for each of my workflow steps. For example:
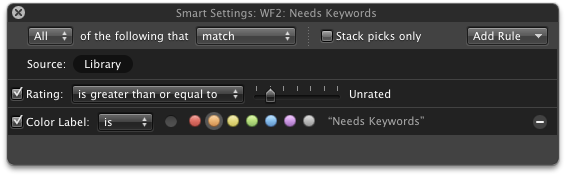
The album is for the entire library and is very simple - find any photos that haven't been rejected and have a given color label. Also, to ensure I catch more of my own mistakes, I don't limit the filter and leave "Stack picks only" unchecked. I want to catch as much as possible.
Closing Thoughts
To reiterate, this workflow works for me. Other workflows will work equally well. As you will read elsewhere, make it yours and then be consistent.
You may wonder if there's enough color labels. Hopefully. Every workflow I studied was represented in 8 steps or less, so the colors work nicely., so in fact using the colors to determine what to do next allows for up to 9 major steps (I have 7 steps, but only use 6 color labels). But, if your workflow has more than 9 major steps, then color labels won't work for you.
You may ask, "What about Faces?" I don't care about Faces - I find it slows Aperture down, so I use keywords instead (and Faces on the iPad doesn't excite me like Places does). If I ever change my mind, I still have a color label left I could repurpose (once I get through my rating and keyword revisit).
For things like external plugins, I treat those as part of my Adjust step, and add a keyword for the plugin used. Something else that's not explicitly in my workflow is IPTC Captions, which I like to use for photos I push to the web. I use a Smart Album similar to my workflow cross checks to help me catch missing captions. In fact, thus far I've found Smart Albums are able to address many of the ad-hoc needs that may come up in my workflow.
Something I haven't firmed up a solution for is when I have to pause during keywording. For example, where I've assigned keywords for a place and the subject, but haven't handled things like the setting, season, image type (portrait, cityscape) and so forth. I'm pretty certain I can get a Smart Album to help with that, taking advantage of the nested keywords, using my top level keyword buckets. I just haven't worked out all the mechanics yet. Flagging the image is a short term workaround, but doesn't tell me where within my keywording I left off (not as self-documenting as I'd like).
So...that's it. I hope that you found this useful and are able to use the ideas here to fine tune your own workflow.